
Automate Workflows with Microsoft Semantic Kernel Process Framework in .NET
Build intelligent, event-driven workflows using Microsoft’s Semantic Kernel Process Framework to automate content creation, onboarding, and complex tasks with AI and custom logic.
Introduction
Note: The Process Framework Package is currently experimental and is subject to change.
Microsoft’s Semantic Kernel Process Framework represents a groundbreaking toolkit designed to revolutionize business workflow automation by seamlessly integrating AI capabilities with existing systems. This innovative framework empowers developers to craft sophisticated event-driven processes that harmoniously combine custom code, plugins, and large language models (LLMs) to optimize various operational workflows, including content generation, customer onboarding, and complex data processing tasks.
Core Components in Process Framework
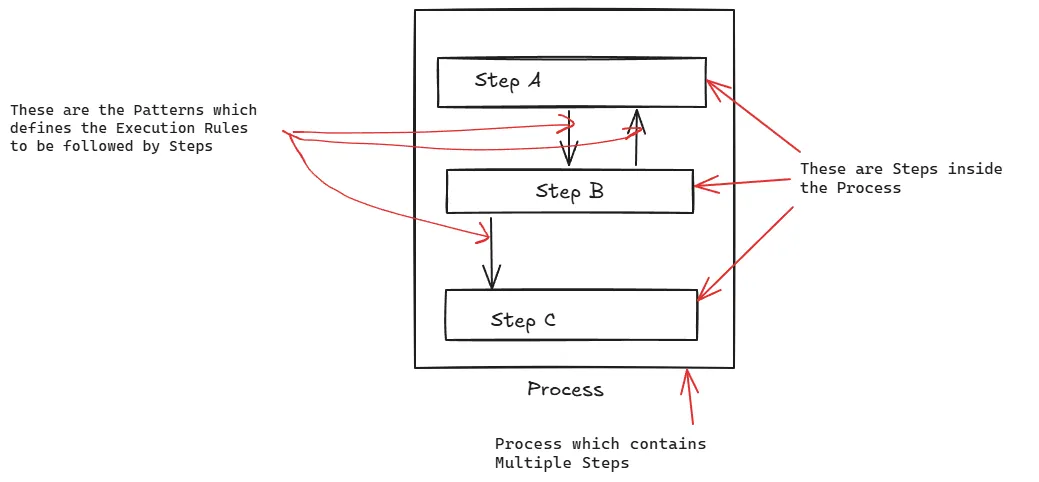
- Process: A methodically structured collection of steps carefully designed to achieve specific business objectives. Each process serves as the overarching container for workflow automation.
- Step: The fundamental unit of work within a process, typically responsible for invoking a user-defined Kernel Function. Steps are the building blocks that collectively form a complete process.
- Pattern: Defines the sophisticated execution rules governing steps within a process, enabling advanced features such as parallel execution, conditional branching, and complex flow control.
The following diagram illustrates the relationship between Process, Step, and Pattern components:
 Process Framework Flow Diagram
Real World Example: Automated Blog Publishing
A comprehensive blog generation process might encompass multiple phases:
- Research Phase: Systematically gather relevant information using web APIs or Google Search to establish a strong foundation of knowledge.
- Content Generation: Deploy an AI Agent that crafts well-structured blog content based on the information collected during the research phase.
- Publishing: Finalize and publish the content after thorough AI-powered review and quality assurance.
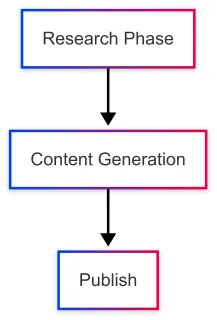
The flowchart illustrates the comprehensive process of Automatic Blog Publishing
Deployment Strategies
The Process Framework features first-class integration support with Dapr and may potentially support Orleans in future releases. Additionally, it provides seamless compatibility with Local Development environments.
In this blog post, we will implement an Automated Blog Publishing system using the Process Framework in a local environment. We’ll start with a straightforward, linear process flow. In our subsequent blog post, we’ll explore implementing the same workflow using Dapr for more advanced deployment scenarios.
Getting Started
Before diving into implementation, ensure you have the necessary Semantic Kernel packages installed:
// Install the Semantic Kernel Process Framework Local Runtime package
dotnet add package Microsoft.SemanticKernel.Process.LocalRuntime --version 1.46.0-alpha
While you can also install the Dapr package, our initial implementation will focus on the LocalRuntime approach. We’ll explore Dapr-based implementation in a future blog post.
Additionally, install the core Semantic Kernel packages with Google Connector support. In our example, we’ll leverage the Google Gemini Model for blog generation through an AI Agent:
dotnet add package Microsoft.SemanticKernel.Connectors.Google --prerelease
dotnet add package Microsoft.SemanticKernel.Agents.Core --prerelease
For more information about building AI Agents in Semantic Kernel, refer to our detailed guide: How to build AI Agent in Semantic Kernel.
Implementing: Automated Blog Publishing
Defining the Process Steps
Each process step is defined as a class that inherits from our base step class. For our automated blog publishing workflow, we’ll implement three distinct steps:
// A Process Step to Gather the Information Related to Product based on its Product name
public class ResearchStep : KernelProcessStep
{
    [KernelFunction]
    public string ResearchRegardingProduct(string productname)
    {
        Console.WriteLine($"[{nameof(ResearchStep)}]:\tGathering product information for product named {productname}");

        // Here we have a hardcoded response for the product information. You can use the AI Agent to actually do these.
        return
            """
            Product Description:
            GlowBrew is a revolutionary AI driven coffee machine with industry leading number of LEDs and programmable light shows. The machine is also capable of brewing coffee and has a built in grinder.

            Product Features:
            1. **Luminous Brew Technology**: Customize your morning ambiance with programmable LED lights that sync with your brewing process.
            2. **AI Taste Assistant**: Learns your taste preferences over time and suggests new brew combinations to explore.
            3. **Gourmet Aroma Diffusion**: Built-in aroma diffusers enhance your coffee's scent profile, energizing your senses before the first sip.

            Troubleshooting:
            - **Issue**: LED Lights Malfunctioning
                - **Solution**: Reset the lighting settings via the app. Ensure the LED connections inside the GlowBrew are secure. Perform a factory reset if necessary.
            """;
    }
}
We’ve defined our first step, ResearchStep, by inheriting from the KernelProcessStep class. Within this step, we’ve included a function decorated with the KernelFunction attribute. The KernelFunction attribute defines a block of code that can be invoked by native code or by an LLM. In the context of the Process Framework, KernelFunctions serve as the invocable members of a Step, and each step requires at least one KernelFunction to be defined for proper operation.
// A process Step to generate the blog based on the information gathered while preserving the State.
public class ContentGenerationStep : KernelProcessStep<GenerateDocumentState>
{
    // Initializing the State for the First time
    private GenerateDocumentState _state = new();

    private string SystemPrompt = """
        Your job is to write high quality and engaging user blog. You will be provided with information about the product in the form of internal documentation, specs, and troubleshooting guides and you must use this information and nothing else to generate the blog. If suggestions are provided on the blog you create, take the suggestions into account and rewrite the blog. Make sure the product sounds amazing.
        """;

    // Called by the process runtime when the step instance is activated. Use this to load state that may be persisted from previous activations.
    public override ValueTask ActivateAsync(KernelProcessStepState<GenerateDocumentState> state)
    {
        this._state = state.State!;
        this._state.ChatHistory ??= new ChatHistory(SystemPrompt);
        return base.ActivateAsync(state);
    }

    [KernelFunction]
    public async Task GenerateContentAsync(string productinfo, Kernel kernel, KernelProcessStepContext context)
    {
        Console.WriteLine($"[{nameof(ContentGenerationStep)}]:\tGenerating blog for provided productInfo...");

        // Add the new product info to the chat history
        this._state.ChatHistory!.AddUserMessage($"Product Info:\n{productinfo}");

        // Get a response from the LLM
        IChatCompletionService chatCompletionService = kernel.GetRequiredService<IChatCompletionService>();

        GeminiPromptExecutionSettings promptexec = new GeminiPromptExecutionSettings()
        {
            MaxTokens = 5000
        };

        var generatedDocumentationResponse = await chatCompletionService.GetChatMessageContentAsync(this._state.ChatHistory!, promptexec);

        DocumentInfo generatedContent = new()
        {
            Id = Guid.NewGuid().ToString(),
            Title = $"Generated document",
            Content = generatedDocumentationResponse.Content!,
        };

        // Adding the Message to the State
        this._state!.LastGeneratedDocument = generatedContent;

        // Emitting the Event
        await context.EmitEventAsync("ContentGenerated", generatedContent);
    }
}
The ContentGenerationStep is particularly noteworthy because it’s a Stateful Step, meaning it maintains state across multiple invocations. Process steps can be either Stateful or Stateless depending on the requirements. In this case, ContentGenerationStep maintains both the ChatHistory and the LastGeneratedDocument when called multiple times, ensuring continuity in the content generation process.
This step also demonstrates how to emit events externally by calling EmitEventAsync on the KernelProcessStepContext object, specifying an event ID and passing content to the next step. To access an instance of KernelProcessStepContext, simply add it as a parameter to your KernelFunction, and the framework will automatically inject it during execution.
// A process step to publish the generated blog
public class PublishStep : KernelProcessStep
{
    [KernelFunction]
    public DocumentInfo PublishDocs(DocumentInfo documentinfo)
    {
        // For example purposes we just write the generated docs to the console
        Console.WriteLine($"[{nameof(PublishStep)}]:\tPublishing Blog");
        Console.WriteLine(documentinfo.Content);
        return documentinfo;
    }
}
Our final step, PublishStep, receives the parameter from the previous step and completes the workflow by publishing the content.
Defining the Process Flow
Now, let’s define how each step should interact with subsequent steps and which steps should be included in our process:
// Create the Process Builder
ProcessBuilder processbuilder = new ProcessBuilder("automaticblog");

// Add the Steps in the Process builder
ProcessStepBuilder researchstep = processbuilder.AddStepFromType<ResearchStep>();
ProcessStepBuilder contentgenerationstep = processbuilder.AddStepFromType<ContentGenerationStep>();
ProcessStepBuilder publishstep = processbuilder.AddStepFromType<PublishStep>();

// Add the Flow to the Steps in the Process builder
processbuilder
    .OnInputEvent("start")
    .SendEventTo(new ProcessFunctionTargetBuilder(researchstep));

researchstep
    .OnFunctionResult()
    .SendEventTo(new ProcessFunctionTargetBuilder(contentgenerationstep));

contentgenerationstep
    .OnEvent("ContentGenerated")
    .SendEventTo(new ProcessFunctionTargetBuilder(publishstep));

publishstep
    .OnFunctionResult()
    .StopProcess();
There are several important concepts at work here, so let’s break them down step by step:
-
Create the builder: Processes utilize a builder pattern to simplify the wiring of components. The builder provides methods for managing steps within a process and for controlling the process lifecycle.
-
Add the Steps: Steps are added to the process by calling the
AddStepFromTypemethod on the builder. This allows the Process Framework to manage the lifecycle of steps by instantiating instances as needed. In our implementation, we’ve added three steps to the process and created a variable for each one. These variables provide handles to the unique instance of each step, which we’ll use to define the orchestration of events. You can also add steps from another process using theAddStepFromProcessmethod for more complex workflows. -
Orchestrate the events: This is where we define the routing of events from step to step. Our workflow follows this sequence:
-
When an external event with id = “start” is sent to the process, this event and its associated data will be sent to the
researchstep. -
When the
researchstepfinishes execution, we capture its result using theOnFunctionResult()method and send the event to thecontentgenerationstep. -
After the
contentgenerationstepgenerates the blog content, it emits a “ContentGenerated” event. We then route this event to thepublishstep. -
Finally, after the
publishstepreturns its result, we stop the process usingStopProcess().
-
Building and Running the Process
After defining the process flow, the next step is to build and execute the process:
// Building the Process Builder
KernelProcess process = processbuilder.Build();

// Starting the Process
await process.StartAsync(kernel, new KernelProcessEvent() { Data = "GlowBrew", Id = "start" });
Here, we build the Process and invoke the StartAsync function, passing the kernel and an initial event with ID and data. The “start” event ID triggers the execution of our defined steps.
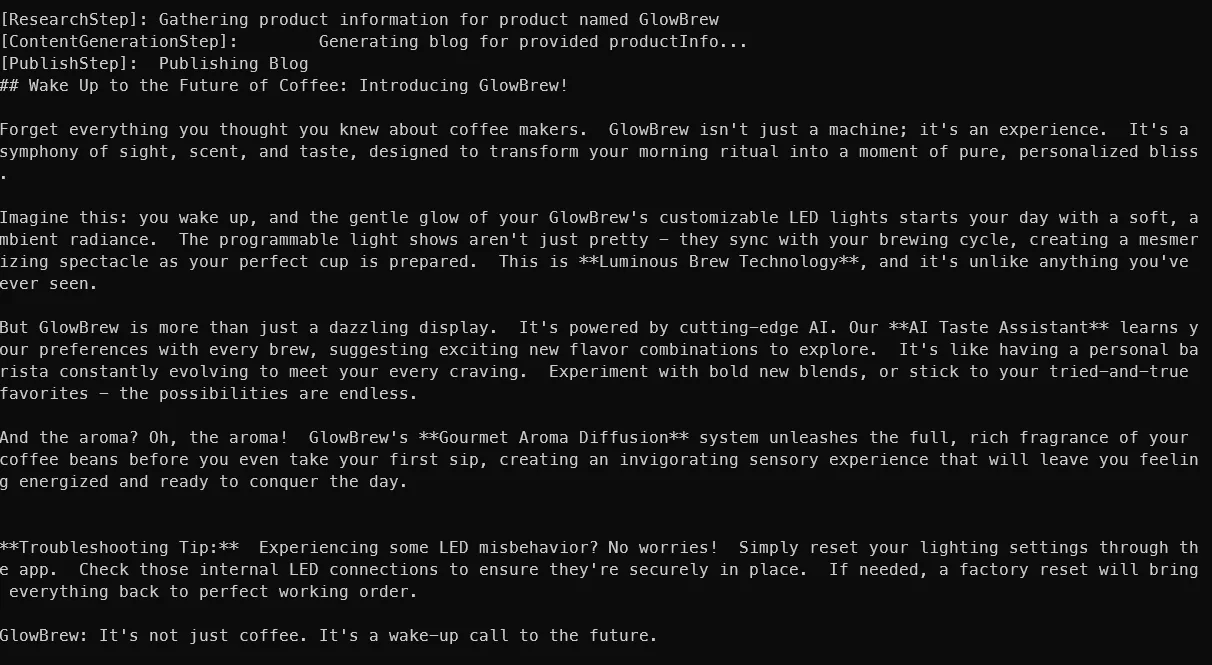
The output demonstrates our automated workflow in action, generating a blog and publishing it without manual intervention:
The Semantic Kernel Process Framework enables you to create complex processes for various business scenarios such as account opening, food delivery services, and more. You can define multiple functions within a single step while precisely controlling the flow by specifying which function to call at each stage of the process.
Conclusion
Microsoft’s Semantic Kernel Process Framework offers a powerful solution for building AI-integrated business workflows, enabling developers to create event-driven applications that combine custom code, plugins, and language models to automate complex processes while maintaining clean separation of concerns.